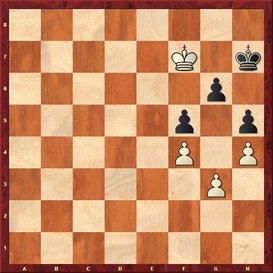
God of Blunder
  • Home
  • Endgames
    • Basic Mates >
      • Mating with a Queen
      • Mating with a Rook
      • Mating with Two Bishops
      • Mating with Bishop and Knight
    • Pawn Endgames >
      • The Square of the Pawn
      • Key Squares
      • Opposition
      • Knight's Pawn Trap
      • Reserve Tempo
      • Overpass/Underpass
      • Rook's Pawn
      • Bodycheck
      • Critical Squares
      • Protected Passed Pawn
      • The Magic Rectangle
      • The Deep Freeze
      • Major Line
      • Triangulation
      • Widening the Beachhead
      • Outside Passed Pawn
      • Breakthrough
    • Knight Endgames >
      • The Deflecting Knight Sacrifice
      • Stamma's Mate
      • Drawing Positions
      • Knight vs Rook's Pawn
      • Knight Check Shadow
      • The Knight Defends the Pawn
      • Fine's Rule
      • Botvinnik's Rule
    • Bishop Endgames >
      • The Principle of One Diagonal
      • Wrong Rook's Pawn
      • Elementary Fortresses
      • Pawns in the Crosshairs
      • Bishop and Pawn vs. Bishop
      • Same-Colored Bishops
      • Opposite-Colored Bishops
    • Bishop vs. Knight
    • Rook Endgames >
      • Rook vs Pawn
  • Tactics
    • Direct Tactics >
      • Double Attack
      • Simultaneous Attack
      • Discovered Attack
      • Discovered Attack with Check
      • Discovered Check
      • Windmill
      • Double Check
      • Skewer
      • Absolute Pin
      • Relative Pin
      • Breaking the Pin
      • Trapped Piece
      • Passed Pawn
      • Zwischenzug
      • Zwischenschach
      • Counter Attack
      • Zugzwang
      • Invasion
      • Unstoppable Threat
      • Ambush
      • X-Ray Attack
      • Gain of Time
    • Support Tactics >
      • Forcing Moves
  • Openings
    • 1.e4 e5 >
      • Ruy Lopez >
        • Overview >
          • Chigorin Variation
          • Breyer Defense
          • Zaitsev Variation
          • Marshall Attack
          • Open Variation
          • Steinitz Defense Deferred
          • Exchange Variation
          • Berlin Defense
          • Minor Lines
        • Traps
        • Plans
        • Illustrative Games
      • Italian Game >
        • Overview >
          • Giuoco Piano
          • Giuoco Pianissimo
          • Evans Gambit
          • Two Knights Defense 4.Ng5
          • Two Knights Defense 4.d4
          • Hungarian Defense
        • Traps
        • Plans
        • Illustrative Games
      • Scotch Game >
        • Overview
        • Traps
        • Plans
      • Spanish Four Knights
      • Glek System
      • Ponziani Opening
      • Petroff Defense
      • Philidor Defense >
        • Overview
        • Traps
        • Plans
        • Illustrative Games
      • Latvian Gambit
      • Elephant Gambit
      • Damiano Defense
      • Vienna Game
      • King's Gambit >
        • Overview >
          • King's Gambit Accepted
          • King's Gambit Declined
        • Traps
        • Plans
        • Illustrative Games
      • Bishop's Opening >
        • Overview
        • Traps
        • Plans >
          • 5...Bd6
          • 5...Bb4+
        • Illustrative Games
      • Center Game
      • Danish Gambit

Major Line

In the fight for three adjacent key squares only taking the opposition on the major line brings success. When the enemy king retreats from the major line you must outflank him.
How do we determine the major line? We must use our abstract reasoning skills and imagine a fantasy position. For example, from the starting position of this endgame

Picture

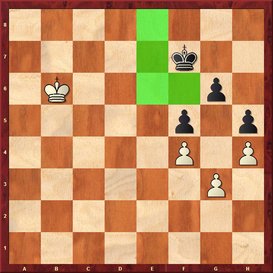
we might imagine a fantasy position such as this
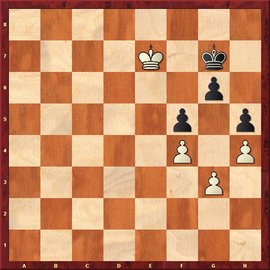
Picture

or this

Picture

from where we are assured that the opposition will be successful. Since we are taking the opposition on the 7th rank, therefore the 7th rank is the major line. In other words, White wants to take the opposition on the 7th rank and outflank on the other ranks.

Powered by Create your own unique website with customizable templates.